
How to Embed Amazon Product Images, Affiliate Links and Native Shopping Banners
Are you a new Amazon affiliate looking for a tutorial on how to embed product links and images to your WordPress blog? You’ve come to the right place.
Here’s my step by step tutorial on how to insert Amazon Associates links, images and banners to a WordPress site, earn affiliate commissions, and use the Amazon Site Stripe correctly.
Because, as you might know, once you apply to the Amazon affiliate program, you can start embedding and promoting products right away, in the hopes of making 3 sales in the first 180 days. That is actually a requirement for them to finally approve your application, so don’t wait any longer to get started!
READ THIS FIRST: How to get started as an Amazon affiliate
This tutorial will assume that you’ve already applied to be an affiliate, and that you have access to the Amazon Associates dashboard. If you haven’t – be sure to check out the article linked above first.
Another quick note, before getting started. This post contains affiliate links. This means I may earn a commission should you chose to make a purchase using my link. So you might get to see affiliate links in action!
If you’re a visual learner, be sure to check out my Youtube video on this first:
And if you follow written instructions better, you’re going to love my step-by-step guide on how to find and use your Amazon affiliate links to monetize your blog content below! So let’s dive into it.
How To Add Amazon Affiliate Links To Anchor Text In WordPress
One of the best ways that bloggers can use Amazon affiliate links to promote products they love is by simply linking to them. Weather you are writing a review of one product, create a list or round-up of more, or mentioning resources randomly in your articles, you have the opportunity to link your unique Amazon affiliate link to the anchor text of your choice.
The anchor text is the word/s or phrase you’re attaching the link to.
For example, you could say something like “check out my Amazon favourite book“.
You could link to the brand name, product title, a call of action of your choice or so on. Nothing is off limits, but in my experience, it’s better to choose an anchor text that tells the reader exactly what’s on the other side, rather then just saying “click here“.
Now that you’ve seen an Amazon affiliate link in action in the form on anchor text, it’s time to show you how easy it is to do for your own WordPress blog! Just follow the next steps:
- Log in to the Amazon customer account associated with your affiliate account.
- Go to Amazon.com (or any other Amazon marketplace) and browse for the product you would like to link to.
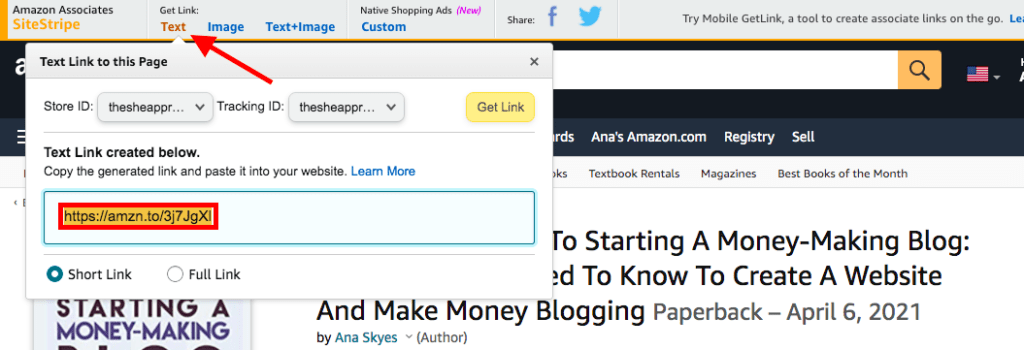
- You should see a grey bar (called the Site Stripe) at the top of your tab.
- Click on “Text” and copy the link provided (you can use the shorten version of the link, or the full version – up to you!).
- Go back to the WordPress blog post you’re working on.
- Select the anchor text, and paste in the link – as you would for any other link. Followed the detailed guideline below, if you’re new to adding links in your WordPress content.
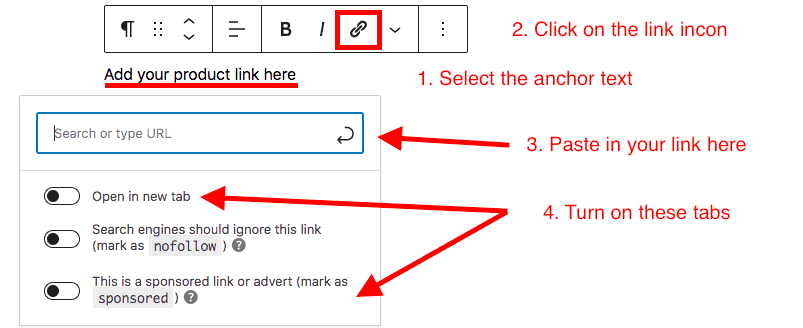
- Don’t forget to make the link open in a new tab, and mark it as “sponsored”.
- Add as many links to as many products as you need, following the same process.
And of course, don’t forget to add an affiliate disclosure in each article where you use affiliate links. This is legally required to let your readers know that you will earn a commission if they purchase anything on Amazon through your link.
Amazon is also very specific and strict about this, so you don’t want to forget. They also require you to use a specific disclaimer pertinent to them. I included the exact disclaimer I use in my article on this below.
READ NEXT: How To Properly Disclose Your Affiliate Links
Keep in mind that according to Amazon’s TOS, you can only add and share links in public blog posts and pages.
To avoid being kicked out of their affiliate program, never share your links in offline sources (such as PDFs, private message boards, private FB groups, emails, password protected pages and so on).
How to Add Amazon Product Images To Your Blog Posts
Adding affiliate links to your posts or pages is relatively the easy part. But when it comes to adding Amazon products onto your blog, with your affiliate link attached to it, there is a specific way you have to do it.
Unlike other products that you might be promoting on your blog, you can’t just screenshot or download the seller’s images and embed them onto your WordPress blog with your affiliate links – you can only use the Amazon Site Stripe.
That will generate a unique code for you, which will display the image for you automatically, when embedded correctly. Here’s how to do that:
- Log in to the Amazon customer account associated with your affiliate account.
- Go to Amazon.com (or any other Amazon marketplace) and browse for the product you would like to link to.
- Find the Amazon Associates Site Stripe (top of your page).
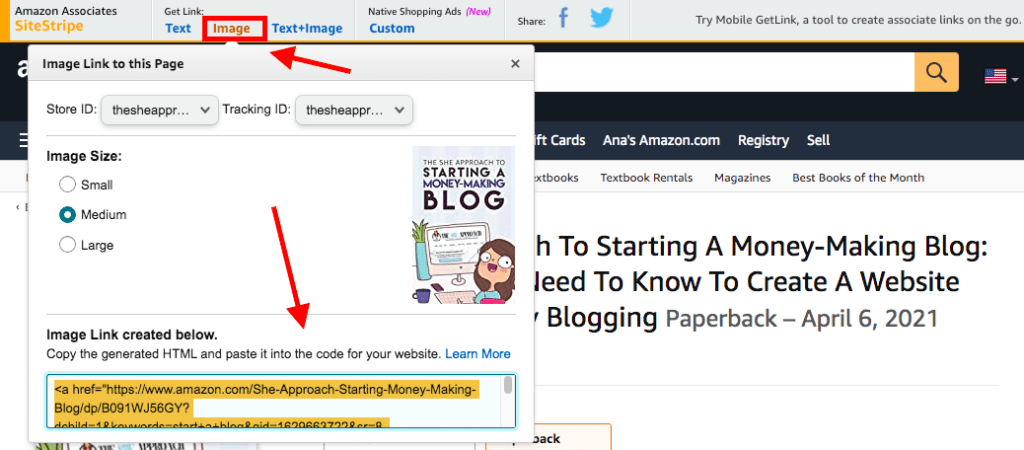
- Click on “Image” and select the desired image size (I usually go for Large).
- Copy the unique image code generated. It should start with “<a href”.

- Come back to your WordPress post. If you use the new Gutenberg editor, all you need to do is to add a new “HTML” block, and paste the code in there.
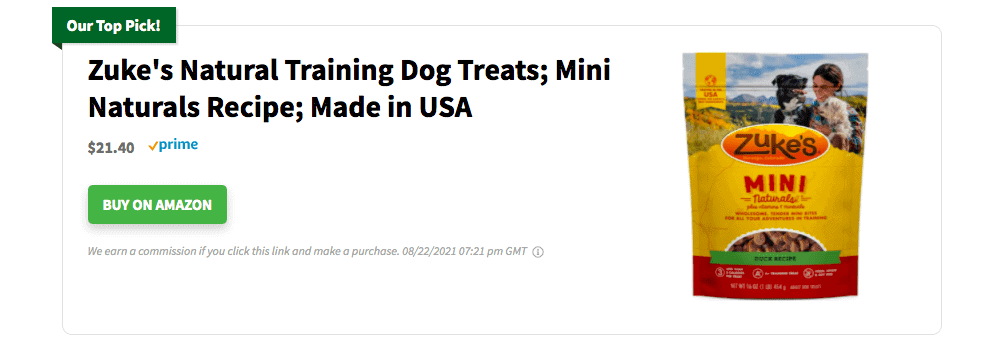
Your final result should look a little something like this – a simple and clean product image, with your affiliate link already embedded. >>

And just for reference, that is a medium image – which is why, in articles where I want the products to stand out, I usually go for the large image code.
If you still use the Classic editor in WordPress, you will need to first:
- Mark where in your article you want to add your image.
- Click “Edit as HTML” from the top right corner.
- Paste in your Amazon affiliate image code.
- Go back to “Edit visually” to return to normal and preview your image.
If you’re struggling with that aspect, scroll back to the beginning of this post and watch the Youtube video attached, as you’ll be able to better follow through.
How to Display Amazon Links & Images Better
Because Amazon has so many rules that affiliates must abide by, it’s sometimes hard to offer our readers a good display of product choices directly on our WordPress blog.
Most of the times our links and affiliate images are overlooked, you barely get any clicks and you only make pennies, even if you have good blog traffic.
Not to mention the fact that we can’t mention product prices – only send them to Amazon for them to check. That is because Amazon wants to make sure we’re communicating updated prices, as sellers sometimes raise or lower their fees.
If you want a better way to display your Amazon affiliate links and increase your clicks, I highly recommend the Lasso affiliate plugin. See it in action below.
You can use Lasso for any affiliate links – not just Amazon – and combine multiple affiliate program, manage all your links in one place and a lot more.
But here’s why I love it, and why I use it for my secondary pet blog:
- It allows you to create custom product boxes that better display the products you want to promote. This attracts more clicks, and increases your commissions.
- It lets you know when Amazon products are out of stock, so you can find replacements and not lose out on any potential affiliate sales!
- It automatically pulls the product price from Amazon + updates it every 24 hours.
- It displays the Prime badge. (People instantly recognise it!)
- It allows you to create custom banners or calls to action.
- It creates a cohesive branded look on your blog that looks less spammy.
Try Lasso for free for 14 days here to better display your affiliate links.
But I’ve been using it for my second blog, and earning 80% more in Amazon affiliate sales than I do on this blog. Coincidence? I think know not.
How To Add Amazon Native Shopping Ads & Banners
If you want to take it one step further, display multiple products and try new strategies to be able to earn more as an Amazon affiliate, you can also include Amazon banners.
You can create your own, and display a list of 4 products – of your choice or recommended by Amazon, you can use their Native Shopping Ads. Here’s how to find and create those:
- Log into your Amazon Associates dashboard.
- Go to Product Linking > Native Shopping Ads.
- In the “Create” bar at the top, choose the type of display you want to create. To be able to pick all products yourself, select “Custom Ads”. (Recommendation and search ads uses Amazon’s cookies to display different products to different readers. You can still choose the main category or search term though.)
- Find the products you want listed, and the type of banner. I usually stick with the “Grid”.
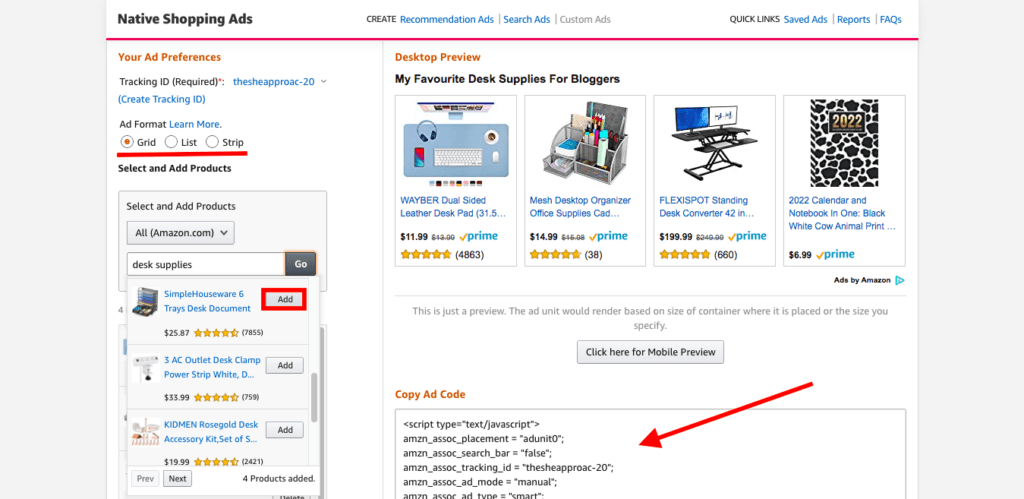
- Add 4 products of your choice.
- Edit the title of the banner and any other details.
- Copy the generated Ad code.
- Paste it on to your WordPress blog in a separate HTML block, like you’ve done for the image ad.
And voila! Instead of one boring image, you have a display of 4 products that come with their title, price and current reviews. See more examples of it in action and more info on how it works here.
These native shopping banners can work quite well, but they really slow down your page speed, so in my experience, I try to limit them to just 1-2 banners per page.
If you want your content to stand out, you can also try creating your own banners with an online banner creator. This works especially well for promoting deals or events such as Prime Day, or getting your readers to shop for specific Amazon product categories.
I create my own banners for my own products – so why not do it for affiliate offers as well? Give it a try!
Promoting Amazon banners or bounties as an affiliate
Additionally, you can use other generate Amazon banners from Product Linking > Banners in your dashboard if you ever want to promote specific categories, events (like Prime day and so on) or offers.
In my experience, you’re better off limiting the amount of banners you use – as people easily ignore anything that looks too much like an ad. Instead, create strategic text links through your content, or use a display plugin like Lasso.
And of course, you don’t want to forget about the Amazon bounty offers for their affiliates. You can find the links for these under Promotions > Amazon Bounty Program.
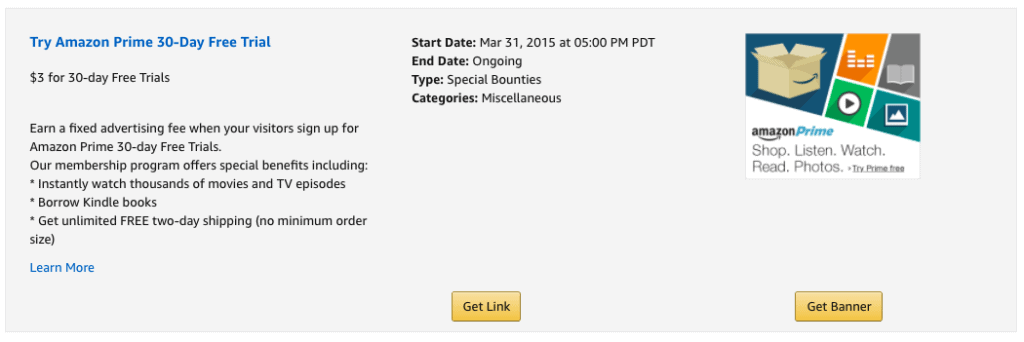
Amazon bounties are set rewards you can win for referring people to one of Amazon’s programs or offers. For example, you get $3 for every person who singes up for a free Prime trial through your link or for a Wedding registry.
These are free for your readers, but you still get rewarded, so it’s a great way to top up your commissions each month. You can see a list of all active Amazon bounties here and grab your links for them.
How To Make More Money As An Amazon Affiliate
The Amazon affiliate program can be a great earner for bloggers and content creators. To give you an idea of what’s possible, my friend Debbie makes $5,000 each month through Amazon sales alone. She shares her Amazon success story here.
The reason why the Amazon Associates program is such a great earner is because people trust Amazon. Almost everyone has an account already or bought something in the past.
So the conversion rates – aka the amount of people who make a purchase after they clicked on a link – is very high compared to other unknown brands or marketplaces for your readers.
Not to mention that you get a commission regardless of the item purchased. So even if you link to a blue notebook, and somebody buys a new toilet seat, you still get paid! And trust me – people buy the funniest things sometimes.
But to get to the point of getting consistent clicks and sales on your blog takes patience, and a really good strategy.
RELATED READ: Amazon Affiliate Program DOs and DONTs Rules For Bloggers
6 tips to increase your Amazon affiliate sales:
- Pick relevant products that solve a need for your audience.
- Display links and images strategically in your content, to ensure clicks.
- Invest in a good Amazon affiliate course to learn new strategies.
- Follow Amazon’s rules – disclaim your links, only add them where permitted and don’t try to cheat by getting your friends to buy through them. They will know.
- Use an affiliate link display plugin to get more clicks and sales.
- Work on increasing your blog traffic – it will help in the long run.
And of course, don’t forget that Amazon isn’t your only option when it comes to affiliate programs. I’ve put together a list of other high-paying programs that you can also join.
That being said, don’t forget that affiliate marketing is a long-run game. You need to be patient and consistent to see results. You also need to make sure you’re creating quality content regularly – content that serves your audience.
If this post was helpful, and you want to learn more about how to become a better affiliate, be sure to also check out the following tutorials:
- How To Make Your First $1,000 In Affiliate Sales
- Best 30 Affiliate Programs For Fitness Bloggers
- My Affiliate Marketing Fail & What I Learned From It
- Best Blogging Income Reports – How Much Do Bloggers Make?
How to Add Amazon Affiliate Links and Product Images To A WordPress Blog in 2024
Thanks for the info – helped me solve an issue that was driving me crazy!
So glad it helped!
Hi, this is really helpful. Do you know how to add the nofollow and sponsored tab/box tick to the image link though as that seems trickier? Or do you not do that? Thanks.
Great question – you should and it’s possible to do if you attach a link to images as well.
I demonstrate it in the video, but you just need to write out either “nofollow” or “sponsored” or both (separated by a blank space) in the image attribute box that opens up in WordPress when you click on the image. (Sometimes this is located in the sidebar instead).
I’m going to include only one affiliate link in the form of an image banner in one post.
Does it adversely affect Google SEO evaluation if you put an affiliate link in the image and induce clicks rather than putting an affiliate link on a specific word?
If it’s one affiliate link in one post, can I not pay much attention?
Of course I’ll give this link a nofollow or sponsored attribute.
Hello. Nope – linking to the image/banner for affiliates won’t affect the SEO of the post. Linking to anchor words will matter more when you interlink / link to other domains you trust, because it does pass on some SEO juice, but the no-follow element of affiliate links discards of that value. And it would only work in the benefit of the websites you link to otherwise.
Hope this helps!
Where are steps to add text+image iframe
I am learning so much from you thanks🙂
Hello, Can you tell me how I can add section for sponsored product like attached Image? I will be happy if you help me in this.
It’s been created with the Lasso plugin. I love it and highly recommend it for affiliate websites.
Info on this post is outdated as of Dec 2023…
I’ve posted an updated tutorial for this on my Youtube – working on updating this post as well soon!