Send Owl Tutorial For Bloggers: How To Sell Ebooks, Printables & Digital Files On WordPress
Have you ever wondered how you can sell digital files on a WordPress blog or to your online audience? Well, look no further, because in this guide I’m going to show you exactly how to use Send Owl to sell eBooks online and deliver them automatically to buyers.
It’s all included in this Send Owl tutorial, with step-by-step instructions with pictures, and the system I’m about to show you can apply to any type of digital product that you might want to sell on your blogging platform.
Before we get started, please keep in mind that this post contains affiliate links, which earn me a commission, at no extra cost for you.
In addition, I’ve been using and paying for Send Owl myself for years, and I’ve sold thousands of copies of my eBooks and other digital products with them. This is why I’m so passionate to recommend them to bloggers and entrepreneurs. You’ll see why in a minute.
What kind of digital products can you sell on your blog with Send Owl?
First things first. Bloggers make money in a myriad of ways. And selling digital products is just one of them. As long as you have an audience to sell to (or you’re in the process of building one now), you can sell the following digital products on your blog or website with Send Owl:
- Ebooks & all other PDF files
- Printables & checklists
- Templates & worksheets
- Stock photos
- Bundles
- Video tutorials or masterclasses
- Access to paid email courses
- Audio files
- Mini-courses
- Graphics & digital art
If you have an idea of a product that you want to sell online, 99% of the time you can use Send Owl to distribute it. As long as that’s something that can be compressed into a file or document, or hosted somewhere else and linked to, Send Owl can handle it for you.
And I’ll show you exactly how to set that up and how to sell digital files with a WordPress blog in this article – so keep reading!
Why should you sell eBooks, printables or digital products online?
Selling digital products can be an amazing way to supplement your passive income on your blog or within your online business. In other words, not only do you diversify your revenue and add a new income stream, but you so do passively.
Because unlike services or personalized products (take for example audits, coaching sessions, VA hours and so on), you create a digital product like an eBook or a printable once, and then you can sell it over and over again with no additional work required from your part.
The end product is always the same, and you can just focus on bringing in sales.
I’ve made over $72,000 to date with my eBooks, online courses and other small digital products, all with a small blog. And that’s why I recommend that every blogger or online entrepreneur should have at least 1 or 2 digital products for sale on their website, even if they are just starting out.
Beyond the awesome monetary benefits of selling digital products, doing so can also help you to:
- Build trust with your audience, so they hire you for services
- Boost your online visibility and get noticed more in your industry
- Get recognized as an expert in your niche
- Create meaningful collaborations
- Serve your readers and clients better, and help them achieve specific goals
And to share a real-life example of this, because of my self-published eBooks, I’ve taken part in awesome collaborations with the Ultimate Bundles team and got the news about my blog to over 20,000 bloggers that I wouldn’t have reached otherwise, I was invited to speak at countless virtual summits and a few in-person events, and I’ve helped my readers achieve awesome results (just read some of my eBook reviews!). Now it’s your turn!
Why you should sell digital products on your blog vs Amazon or Etsy
This is a super common question that I get all the time. Let’s say you’re convinced about the benefits of launching a digital product to sell to your audience. But why should you sell it on your website or blog, instead of platforms with a bigger reach such as Etsy or Amazon?
And that’s a great question!
While Etsy and Amazon, alongside other platforms where you could sell digital files and trainings, often have the benefit of an existing audience, customer base or constant traffic, there are always hidden CONs to selling on there.
Let’s take for example Amazon – if you want to sell an eBook on there, you have to comply with their specific set of formatting rules, meaning you get less control over the design of your eBook. Not to mention that you only get 70% of the sales revenue, and only 30% if you price your eBook anywhere over $9.99.
Etsy, or other platforms, are also known to take a cut of the profits. Etsy also comes with other fees, such as listing fees, marketing fees and so on.
In comparison, when you sell products on your own blog, you get full control over the pricing, and you keep 100% of the profits. Send Owl only charges you a monthly fee (that starts as low as $9), and beyond Paypal fees that you would have to pay anyway, they never charge you a transaction fee.
While the main attraction to sell on platforms like these is that they get a lot of traffic, and you don’t have to work as hard to bring your own audience in, what some bloggers fail to consider is that the competition is steep, which might affect your sales.
This also applies to times when you send your own traffic to those pages. Let’s say for example that someone finds a link from your blog to your printable that you sell on Etsy. They go to check it out, and while they are there, Etsy shows them 10 other options for similar printables. And someone else makes a sale based on the traffic that you sent over…
In conclusion, selling digital files on your own WordPress blog comes with the following benefits:
- More control over the actual product, how it’s packaged, and what it’s priced at
- Less direct competition
- No transaction fees or other hidden costs
- More profits
How to start selling digital products on your WordPress blog – Send Owl Tutorial
Now that we’ve covered the basics, let’s get down to business. This is how you can start selling digital products, eBook, printables or anything else on your blog or website with Send Owl, in a day or less:
STEP 1: CREATE YOUR DIGITAL PRODUCT
Before anything else, you’ll want to create your eBook, printable, bundle, or whatever else that you’re choosing to sell, and have it packaged and ready to send out.
Any eBooks or printables can be saved onto your computer in a PDF format.
For any other digital product, you can save the file, or upload them online (use Dropbox, Google Drive or anywhere that allows you to share a file with those who have a secret link) and grab the link.
If you need help writing, designing or formatting an eBook, check out my tutorials on that first:
To create printables, worksheets or any other documents, I recommend using Canva. And if you want to learn how to sell printables on your blog, the process is the same as for any other digital product.
STEP 2: CREATE A SEND OWL ACCOUNT
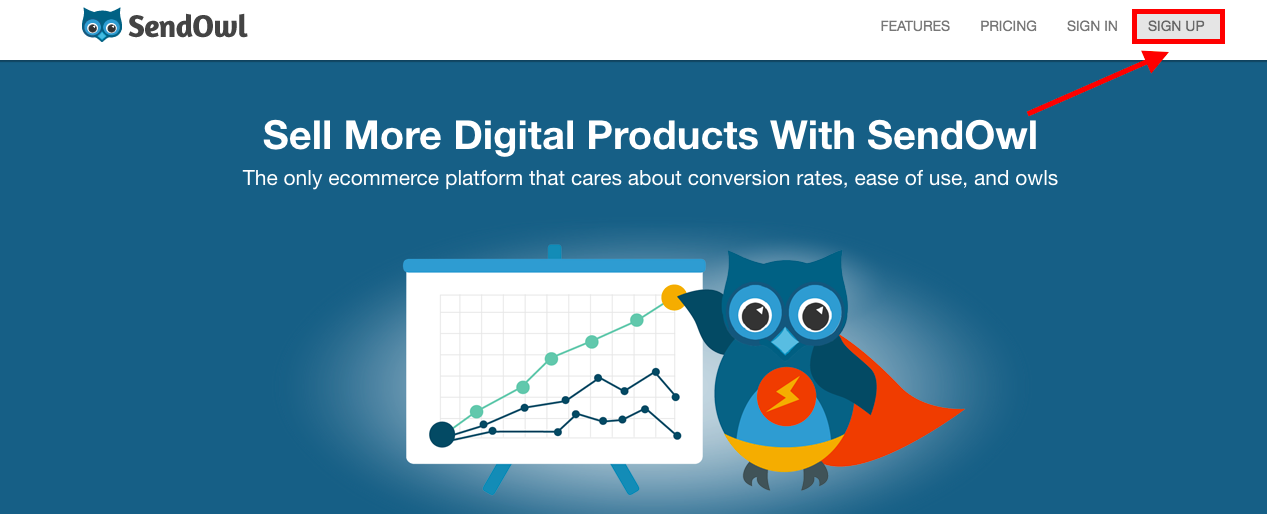
Once your product is ready to go, you’ll want to go and create a seller account with Send Owl (ideally a few days before you’re ready to launch, so you have time to set it all up), by clicking the “Sign Up” button in the right side corner.
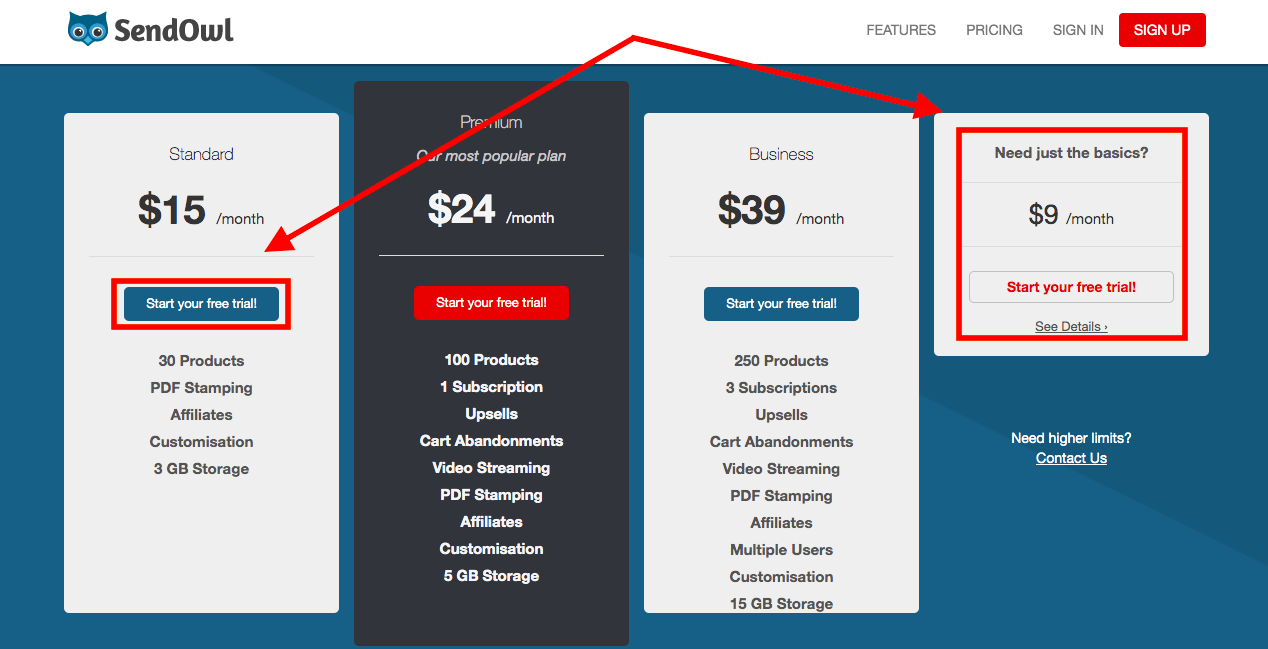
From there you can start a 14-days free trial for any of their plans. If you’re just starting out, I recommend choosing the basic plan (only $9/month) that allows you to sell up to 10 digital products, or the standard plan ($15/month) which is still super affordable and allows you to work with affiliates as well, which is a huge bonus.
You only have to make 1 sale per month to cover the cost of SendOwl, so it practically pays for itself.
Once you choose a plan, you’ll be asked to fill in your basic info (such as name, email and a password), and confirm your email address (don’t forget to check your inbox for this step). You won’t even be asked to fill in your payment or card details until the free trial is over.
STEP 3: SET UP YOUR SEND OWL ACCOUNT
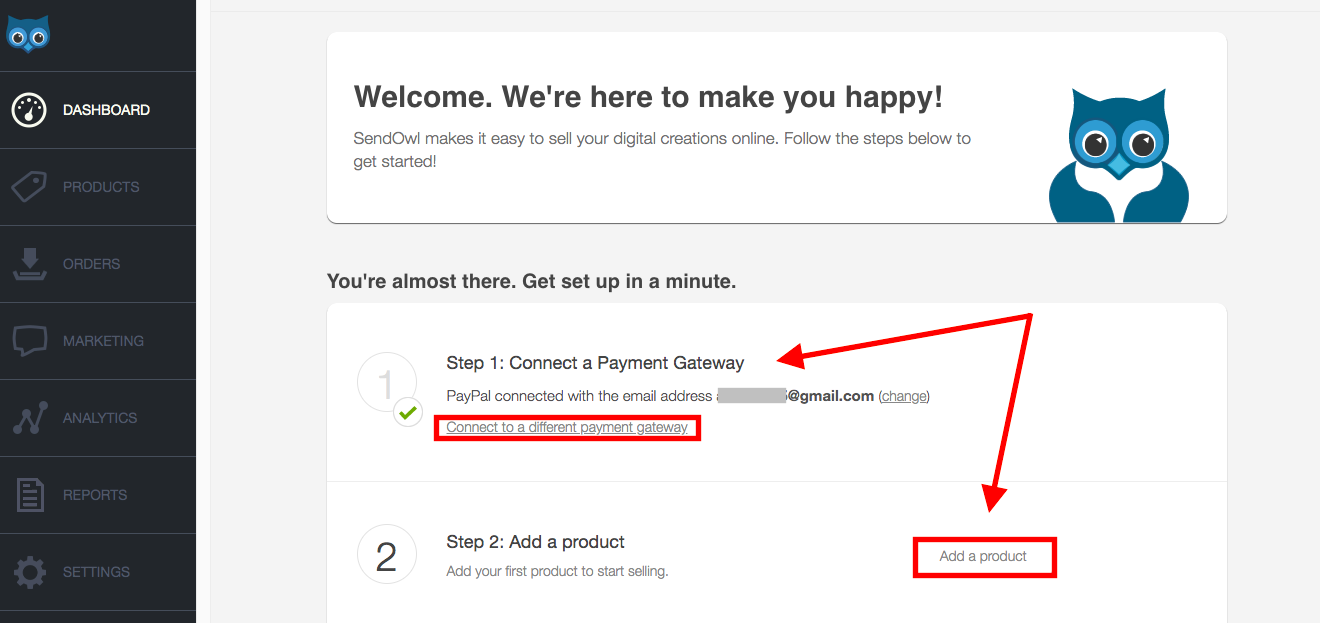
The confirmation link from your email will take you directly into your Send Owl dashboard, where you will need to complete setting up your account.
The first thing you need to do, is to make sure your payment gateway email is correct (this is where you will get paid into Paypal). This will automatically be chosen as the email under which you created the account. If that’s your Paypal email as well, you’re all set.
If, however, you’re using another Paypal email address, you can change that by clicking on the “Connect with another payment gateway”.
From there, you’ll be able to connect with the right Paypal account, and even add Stripe as an option, allowing users to pay with their credit card. (You will need to have a Stripe account set up beforehand as well.)
Before your free trial ends, you’ll also want to go to Settings > Billing and add your billing info as well, but they will remind you of this too. For now, you’ll get to test and play around with their features as you choose.
STEP 4: ADD YOUR FIRST EBOOK OR PRINTABLE FOR SALE
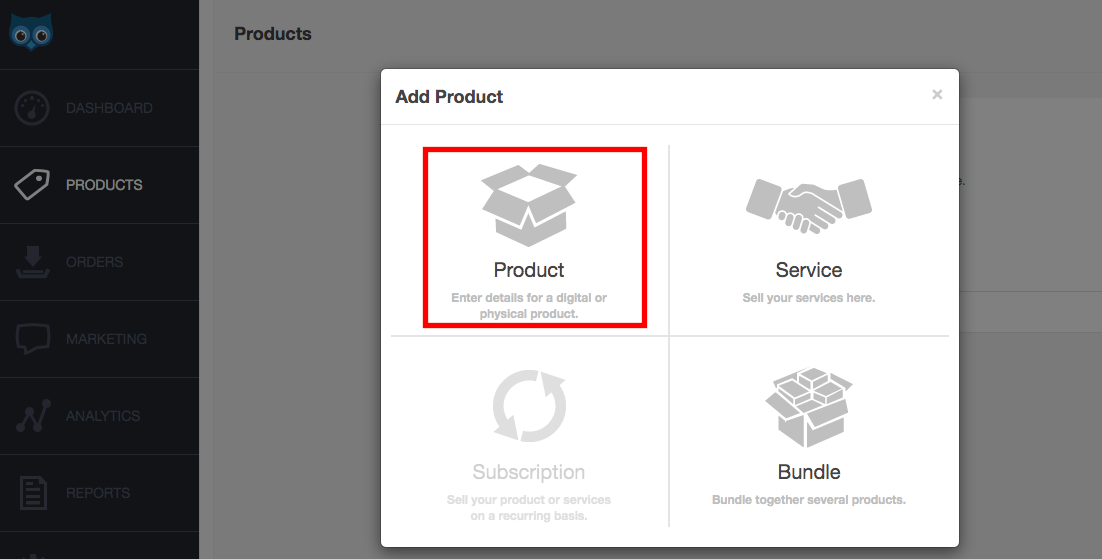
After that, you can add your first product in less than 3 minutes. Simply click on the “Add a product” button from your dashboard page (shown in the previous screenshot), or go to Products > Add new and select “Product”.
In the pop-up window that appears, you then have to name your product (this will be visible to buyers), set the price, and of course, upload your file, or select the URL page where your file is hosted instead.
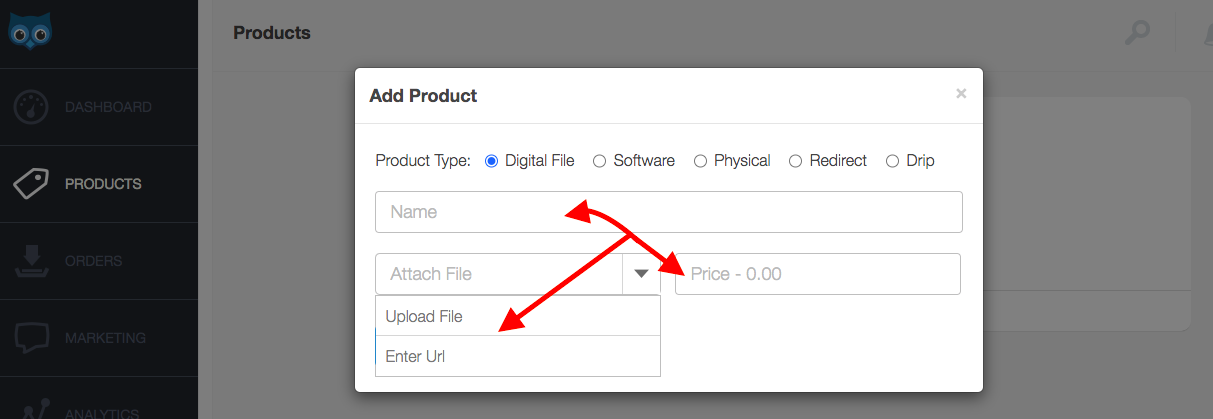
As a rule of thumb, any PDF file and product can be directly uploaded. But if your product is a shareable spreadsheet hosted on Google or on a separate teaching platform, you can select a URL instead of a downloadable file.
And voila! Your product will be technically ready to be distributed and shared with your audience.

But before you do that, you’ll want to scroll to the bottom of that page do the following:
- Click on the “Edit product” link that shows up when you visit your product
- Click on “sales details page”
- Upload a cover photo for your product
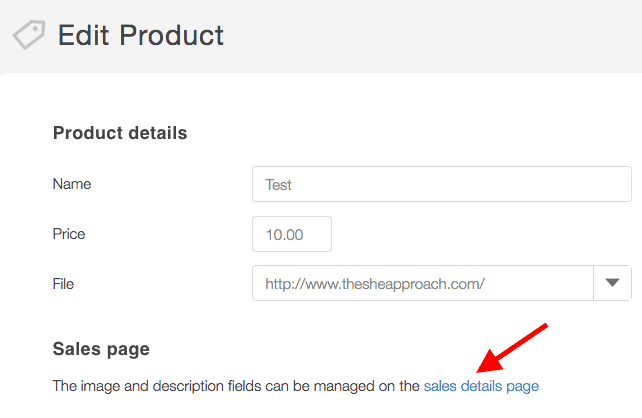
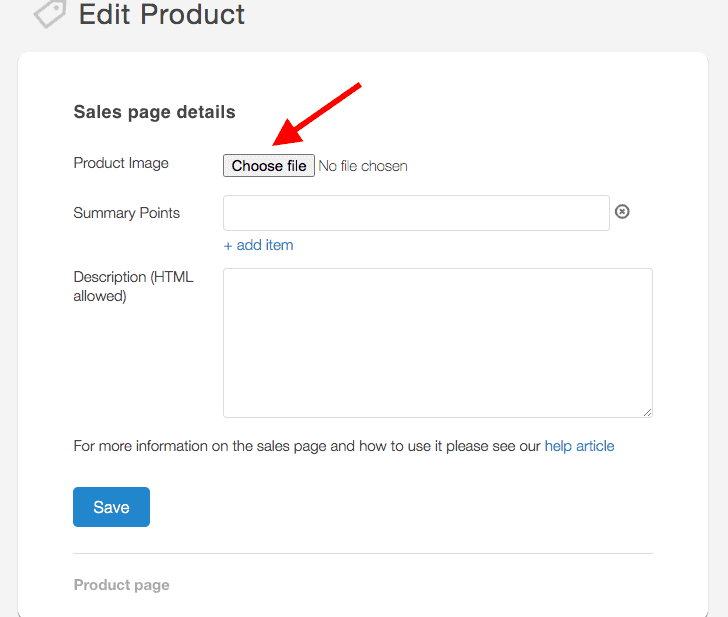
There is no need to fill out any of the other information in this step (such as the bullet points or description), as they are not going to be visible to your buyers because we’re going to build our own sales pages. But the photo is important.
This photo will serve as a mock-up for your product and will be visible to readers when they go through the checkout option. So even if your file is digital, you want to show a physical representation of the product – such as an eBook cover or template of some sort.
You’ll see above how I’ve created mock-ups for my eBook and added a quick image for one of my templates as well. I’ve created these in Canva PRO, and saved them with a transparent background before uploading them.
Alternatively, you can buy pre-made eBook mock-ups to create your own easier. These are going to come in handy when you promote the product on your blog as well, so whatever your digital product is, make sure you create a quick graphic for it.
STEP 5: CONNECT TO YOUR EMAIL PROVIDER
A super important step in keeping track of who bought which ones of your products (so you can exclude them from further marketing emails, or get in touch with them to ask for feedback) is to connect Send Owl to your current email marketing provider.
If you don’t have one already, click here to learn how to start an email list.
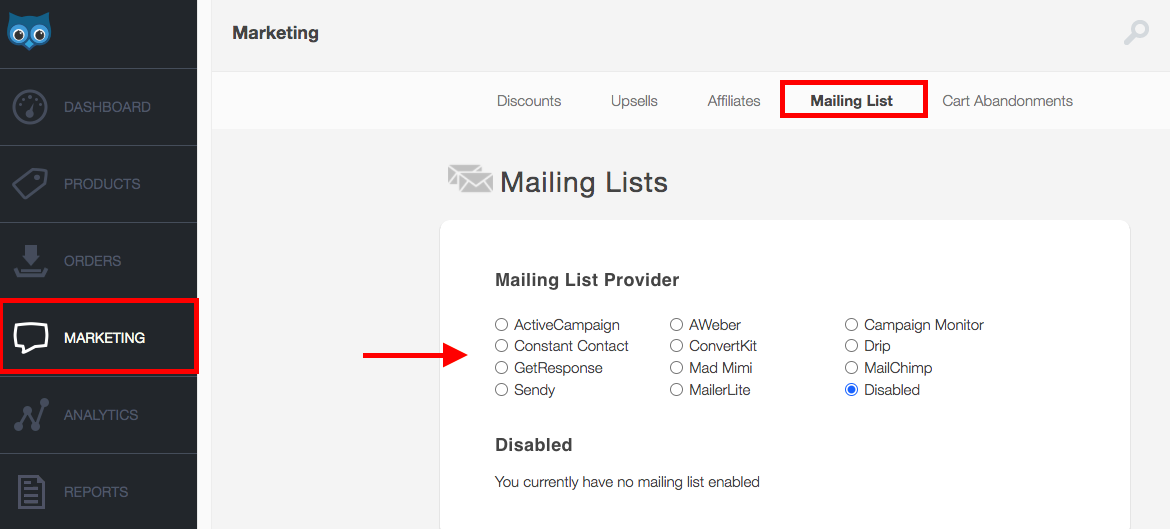
Once you have that set up separately, go to the “Marketing” tab in the sidebar, and find “Mailing List”. From there, you simply choose the email provider that you’re currently using for your blog or business (I recommend Mailerlite) and follow their instructions to integrate it.
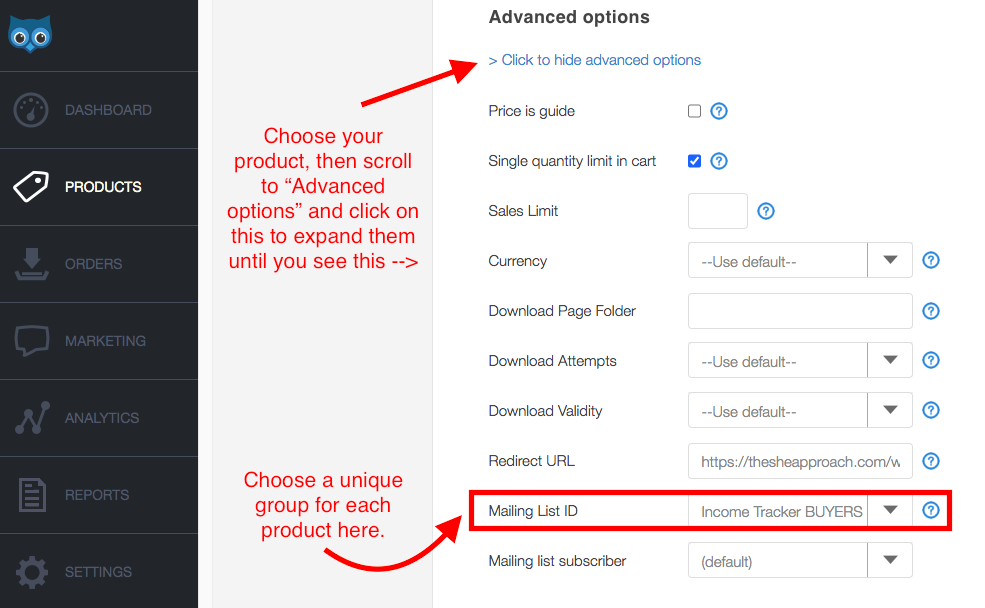
Once you do that, you’ll notice that for every single product that you create, or that you’ve already added, under “Click to see advanced options”, a “Mailing List ID” tab will show up.
To set it up properly, here’s what you need to do:
- Go to your email provider dashboard and create a new group. I call mine something obvious like “Ebook 1 buyers”.
- Go back to Send Owl, pick the product you want to associate with that email group, then using the steps shown above, select this group from the dropdown box near “Mailing List ID” that will appear when you click on the arrow.
- Click save, and you’re all set up!
This will automatically add every person who buys your digital product, to a unique segment of your email list, so if there’s ever any product updates or information you need to send over to them, you have the grouped.
This also helps you to exclude them for further marketing emails (which often result in unscubribers, when you keep promoting something to a person who’s already bought it).
STEP 6: CUSTOMIZE THE SEND OWL CHECKOUT EXPERIENCE
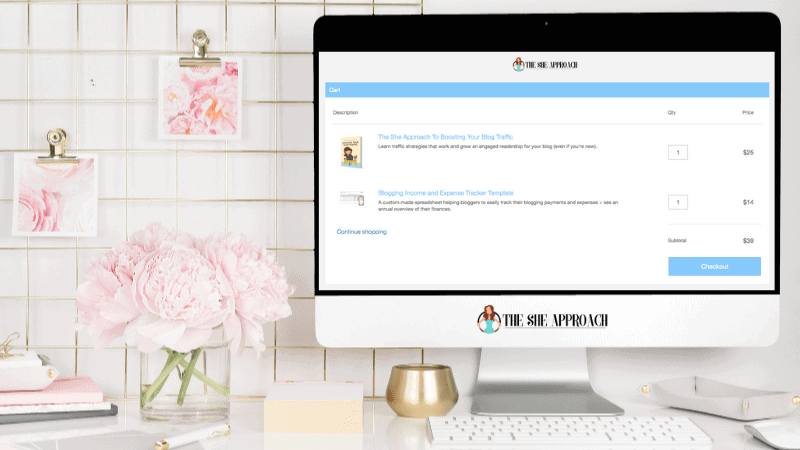
You might’ve seen above that my Send Owl checkout looks a little bit different from the default one. And it even has my logo and branding over it, making it feel more personalized and in theme with my website branding.
I highly recommend doing the same. And it’s only a matter of minutes setting this up. (Although, you need to be on their $15 plan or higher to be able to do so.)
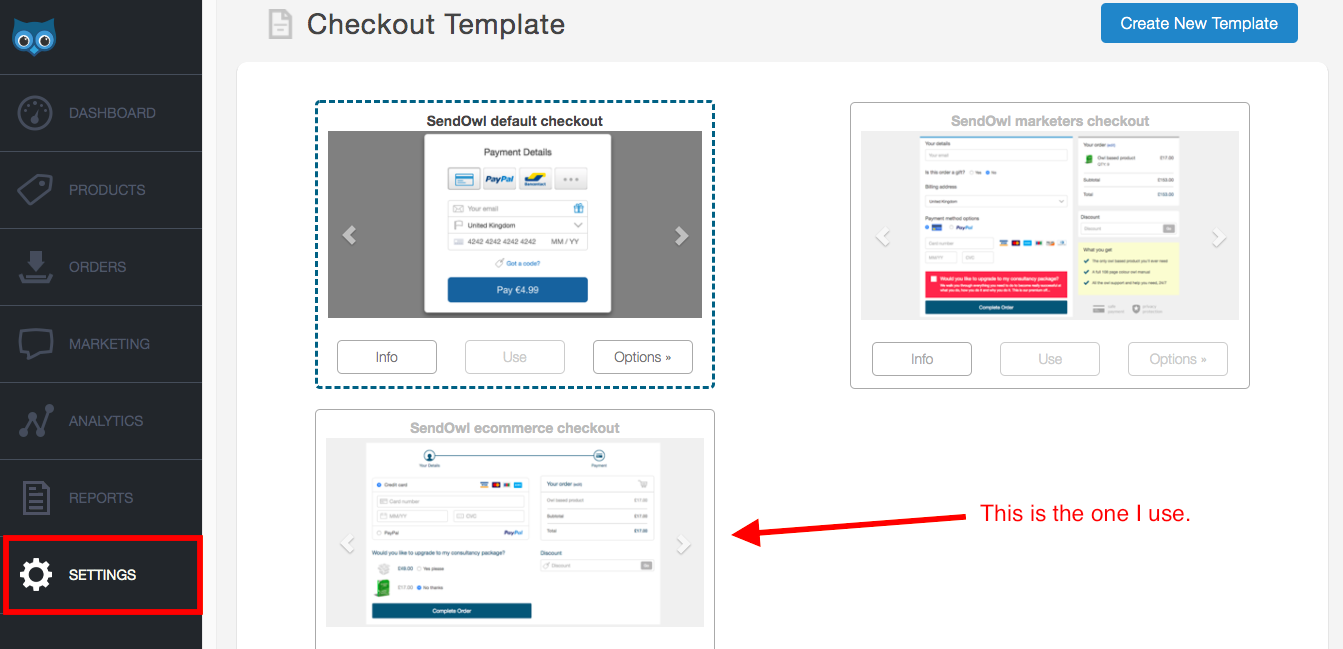
Simply go to Settings and under “Checkout” find “Checkout template”. You will then be presented with a list of three options. I personally like the last one, but you can test them live and see which one you like best, by adding your own product to cart and pretending to buy it.
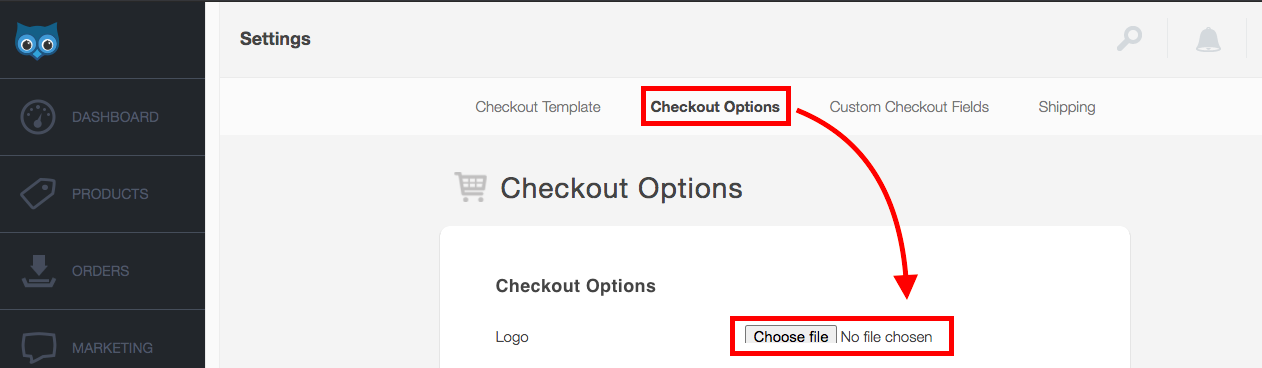
You’ll also want to go to the “Checkout options” tab, and upload your blog or business logo there, as that’s going to show on top of the checkout for your customers, as you’ve seen my logo appear above.
This is optional, but it really brings the whole experience home and ensures buyers that they are in the right place, which drastically lowers cart abandonments.
STEP 7: GRAB YOUR PRODUCT PURCHASE LINK
At this point, you are all set up in the back end to receive product orders, and have Send Owl automatically deliver them.
All you need to do is to grab the purchase link for each one of your product, by going to “Products” > selecting the one you’ve just created, and scrolling to the bottom of the page until you see the “View Button Code” link.
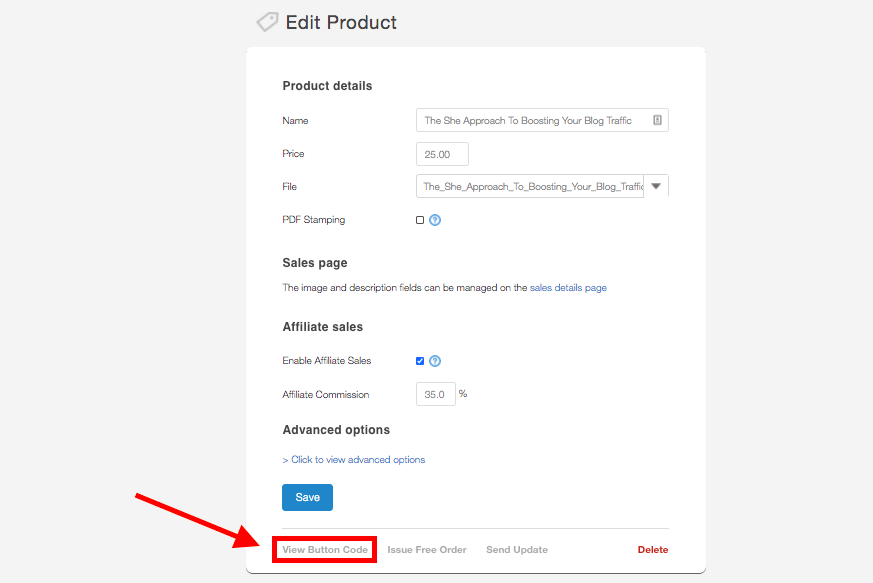
Click on it, and ignore the “Quick Sell” button link at the top. This will take people straight to the checkout process, which looks tacky.
What you want to do instead is to go to the “Sell from your website or blog” section, and select the second entry that says “Add to Cart”. (See below.)
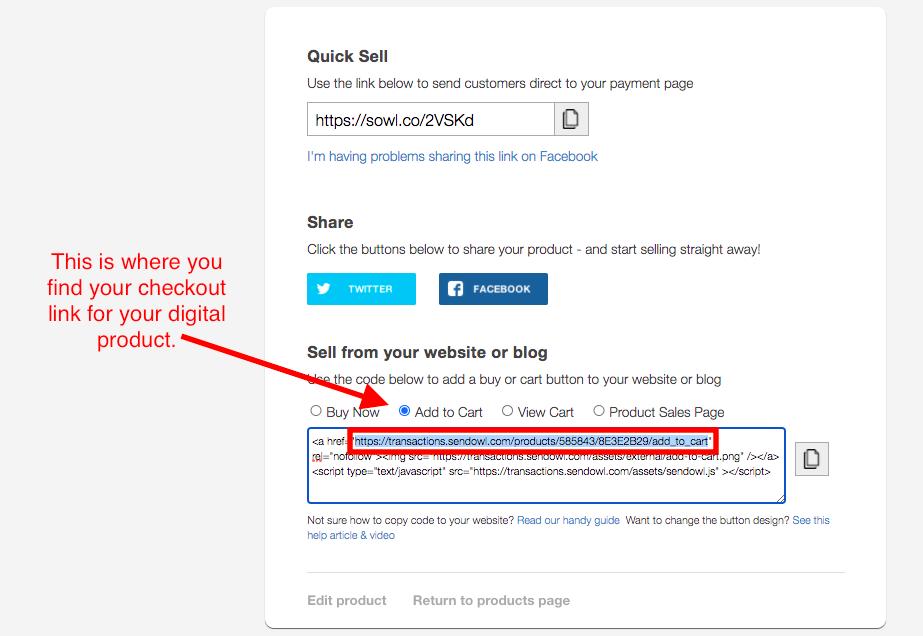
The box below will be automatically populated with an HTML code for a standard “Add to cart” red button, that you can embed anywhere on your WordPress blog and even in emails.
But because I will teach you how to create your own personalized buttons and sales page for this digital product, all you need to grab from this is the first link (it will start with http:// transactions.sendowl and end with add_to_cart).
Grab it, and put it somewhere safe, as you will need to add this to your eBook sales page.
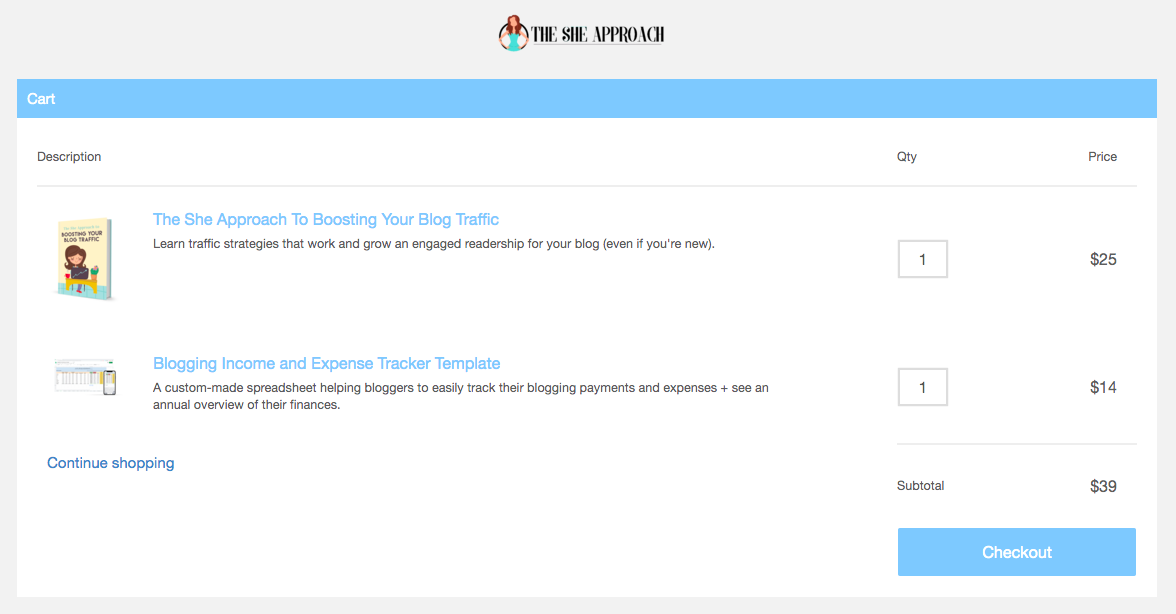
And don’t forget to test it, to make sure everything looks good from the buyer’s perspective. Paste the link in your browser and hit enter.
If you’ve done everything right, it should take you to a cart overview page that looks something like this (but with your eBook or printable showing up there instead):

From there, you will also want to quickly test the checkout button, but you’ll see it’s only a matter of seconds for your audience to complete their purchase and pay via Paypal or using their card.
What happens next? Delivering your digital products to buyers & how Send Owl works
Send Owl will then automatically send the file or the link you associated to each product to the people who buy it via their email alongside some branded download links that look something like this.
You will be notified of new orders via email (and you can check them out in your Orders tab or your Analytics tab at any point), but the process from here on now is totally passive, which is why I love using Send Owl!
All you need to focus on now, is building a sales page for your digital product on your blog and driving sales. Which brings me to the next step!
STEP 8: BUILD A SALES PAGE ON YOUR WORDPRESS BLOG
If you want to sell eBooks or printables on your WordPress blog with Send Owl, the hardest part is already through. But you can’t simply send people to the checkout link, and expect them to buy your digital product without any context.
Just like any other selling platform that you use as a consumer and buyer, your eBook needs to have a sales page where you have a product description, explain what your product is and who it’s for, talk about its features, display the price and so on.
Think about Amazon products – even they have individual sales pages.
To be able to sell printables, digital products or eBooks on your blog or website, all there is left for you to do now is to create a sales page for your product.
How to sell your eBook on WordPress with Elementor:
The simplest way to do that, that doesn’t require you needing to know how to code fancy web pages, is to use the free Elementor plugin. Once installed, you can do one of two things:
- Buy these sales pages templates that you can quickly install and re-use as your own, by simply replacing the photos and text. This is how I got started with building my sales pages in Elementor and they are a true time-saver! Or you can:
- Create your own Elementor pages from scratch. The free version of Elementor allows for a lot of flexibility, and you can use the drag and drop functionality to determine what you want your sales page to look.
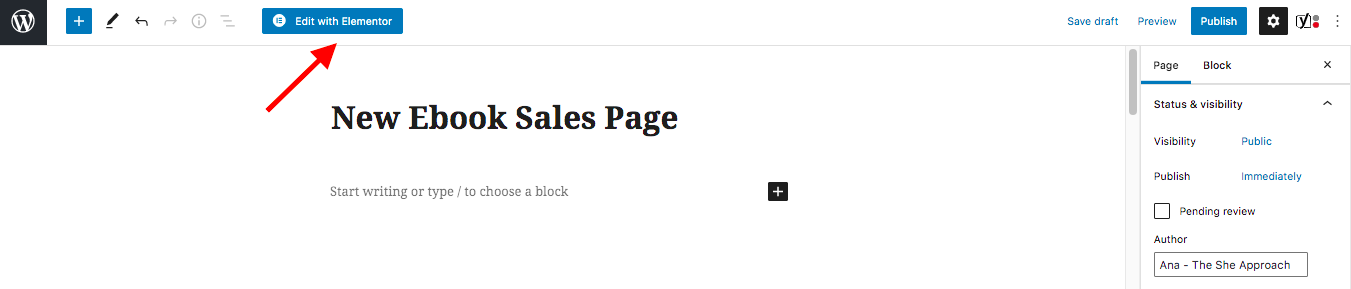
To create your own sales pages on your blog, simply go to your WordPress dashboard > Pages > Add New Page > set a title for your new page then click “Edit with Elementor” and start designing!
A few things you need to include on your sales page are:
- The product tile
- A mock-up of your eBook or screenshots of your printables
- The price & buy buttons (that’s where you would add the Send Owl link you saved earlier)
- A product description
- More features, product testimonials, an FAQ section, your refund policy and so on
If you’re looking for a full guide on how to design stunning sales pages that will drive sales, and a full checklist of the sections that can’t miss from your page, I have video tutorials, checklists and templates, all waiting for you inside my signature course Ebook Bestseller Bootcamp.
Ideally, by the end of this step, you will have a page on your blog where the only action people can take is to buy your eBook (so be sure to get rid of your blog sidebar and your menu).
STEP 9: CONNECT YOUR WORDPRESS SALES PAGE TO YOUR SEND OWL BUY BUTTON
Once you’ve completed your sales page, you will have a couple of “Add to cart” or “Buy this eBook/printable/training” buttons added throughout the page, making it easy for people to go to the checkout process. (Don’t just hide one buy button at the end of your page, making people look for it, because you might lose out on sales.)
Elementor makes it really easy to create buttons and customize the text, colour and size for each, so you can play around with that.
For the final step, all you need to do now is go back to grab the Send Owl “Add to cart” link I showed you how to generate in Step 7, and connect it to each button on the Elementor sales page by pasting it in the “Link box” that appears when you click to edit the button.
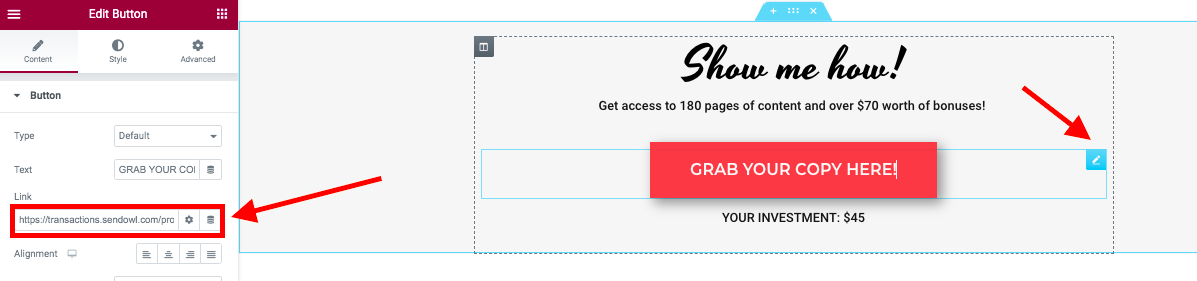
Save your progress, double check your Elementor page live, and test out the links to make sure they open in the right Send Owl cart page that allows people to finalize the purchase.
STEP 10: PROMOTE YOUR SALE PAGE & BRING IN SALES
And voila! You’re all set to sell digital files WordPress blog, by using Send Owl as a payment processor and delivery tool.
From now on, you simply need to guide people to the sales page you’ve just created, by promoting it on your blog, adding it to your menu, sharing it on social media and so on!
Read my article on How To Make Passive Income By Selling Ebooks for more ideas.
After you add 2 or 3 more digital products, following the sale process for each, you can also create a separate shop page on your blog (using a basic Elementor page), to display all your products at once, and link to their individual sales pages like I do in my online shop.
Is it possible to make money selling online products & printables?
As I’ve mentioned at the beginning of this article, in the few years that I’ve been blogging, I’ve earned over $72,000 in digital product sales alone, and that was possible without a huge blog following.
I believe that taking the time to create and add multiple eBooks, printables and other resources to your shop is so worth it! And you can do it too.
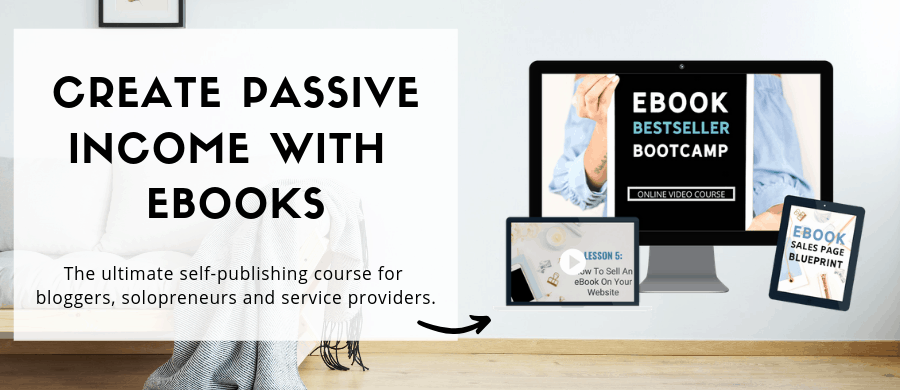
If you’re tired of shooting in the dark when it comes to digital product creation or making sales on your blog for your eBooks or printables passively once you’ve published them, I invite you to join the 2,000+ bloggers that are currently enrolled in my eBook publishing & promotion course.
With over 30 video lessons, in-depth tutorials and more time saving tips & tricks, this course is the ultimate guide for bloggers who want to sell digital files on their website or WordPress blog. And it leaves nothing to chance!
But my hope is that this Send Owl tutorial has provided enough guidance to help you get started on your own.
Send Owl Pricing & Plans Overview
Send Owl is by far one of the most affordable options out there when it comes to selling digital products. Their plans are structured in 4 ways:
- Basic Plan at $9 per month. It allows you to sell 10 Products and has limited customisation.
- Standard Plan at $15 per month. This plan allows you to sell 30 products per month, comes with more features, full customization and affiliate management as well. *Best for bloggers.
- Premium Plan at $24 per month. This plan allows you to sell up to 100 products, 1 subscription (for recurring payments), host an affiliate program and my favourite 2 other features which are the Upsells and Cart Abandonments. *Recommended if you have at least 3-5 digital products to sell.
- Business Plan at $39 per month. This plan is for businesses that have over 250 products for sale, and it encompasses all the features from the Premium Plan, alongside more storage.
I started off on the Standard Plan, and moved to the Premium Plan a couple of years in, when I added a payment plan for one of my courses (that’s set up as a subscription) and included upsells (which provide users with a special offer at the discount if they buy 2 or more digital products at one).
But if this is your first eBook or printable, the Basic or Standard plan will do just fine (depending if you’re planning to start to work with affiliates, for which you need the Standard plan and up).
But you don’t need to take my word for it. Start your free Send Owl trial here!
My Honest Send Owl Review
In conclusion, I believe Send Owl to be the best way to quickly & effectively sell any type of digital downloads on your blog or website, because they offer so much flexibility, while taking care of the checkout and payment process that would be a pain to set up separately.
In 4 years of using them, I never had any issues or problems, and I love the fact that, unlike other tools out there, they don’t charge a transaction fee.
You only need to pay once per month, and there are no other hidden fees or costs. And as your blogging empire expands, you can upgrade your plan to access more features that will allow you to earn even more.
So it’s safe to say that I’m a huge fan of Send Owl!
If you’re on the lookout for even more awesome tools that will allow you to create and sell digital goodies to your audience, be sure to check my resource library above, created especially for bloggers who sell products.
And for even more informational articles on the topic, check out:
- 3 Ways Bloggers Can Make Money With Send Ow
- How To Create Multiple Passive Income Streams With Digital Products
- How To Make Money Blogging – 4 Ways To Earn With A Blog
- How To Create Free Sales Pages In WordPress
- How I Made My First $100,000 Blogging
PIN THIS POST FOR LATER 📌

How To Sell Digital Products On WordPress – Send Owl Tutorial For Bloggers

Great summary Ana! I used to think that Teachable is a great online platform for my courses(partly because I’m enrolled in some great courses, but then I realised that so many creators in blogging communities are using sendowl. I noticed that the sendowl pages were often offering an upsell and I also liked the way the affiliate program is set up. Obviously the pricing is very convincing too haha!
So now I am 95% certain that I will use sendowl moving forward =)
Greetings from Germany, Anike
So glad this was helpful! I love Send Owl for digital products – but the only thing they don’t offer is course hosting. If you need a two in one tool, you might want to check out https://thesheapproach.com/thrive.